This is a tutorial looking at aspects of the particle
emitters used to make the very brief animation found here. Apologies for any over-explaining but
hopefully this will be useful to those new to Carrara
5 (C5) particles. Would rather cover
things some people already know than miss things others don’t. Aiko was animated in Poser 6 and brought into
Carrara 5 Pro via Transposer. The render is one pass with no postwork. The flames
should be equally doable in C5 standard unless someone knows of something that
isn’t available.
For explaining the particle flame effect, I wasn't
sure whether to go backward or forward.
Think I'll go backward to strip away a layer at a time that contributes
to the illusion of a flame. For those
who like to jump ahead to the last page though, here's where we'll end up with
everything simplified and split:
My hope is to put up animated examples as well, but
who knows when I might mess up the web page, have hosting or bandwidth issues,
etc.
As you see, the effect is more than one emitter. C5 particle emitters (PEs)
are very flexible, but I started out trying to have one do everything which
wasn't working out. Not saying it isn't
doable, I just wasn't getting anywhere.
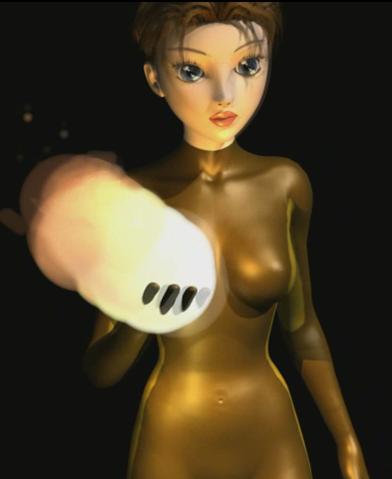
The idea was taken from video game graphics where there is a fat, round
flame around the hands at times fairly close in spirit to the one here. It evokes a candle flame to me, but much
squatter, rougher and less pointy, like some sort of flammable gas spewing out
and burning completely very quickly. The
original intent was for the flame to totally engulf the hand at all times, but
the fingers poking through in earlier trials looked nice to me.
Scene elements:
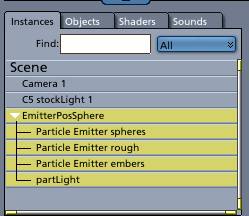
Emitters merged:
Emitters split:
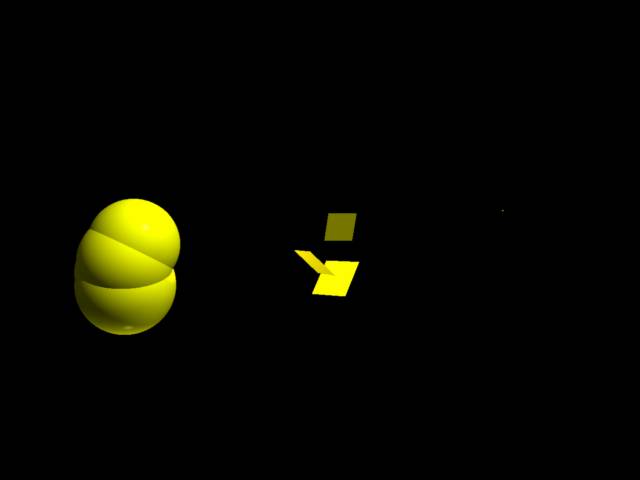
What we end up with is an emitter of spheres to
provide the main volume of the flame. Then
there is an emitter of rectangles to roughen up the flame. Most of this goes "to waste" hidden
inside the spheres. Likewise
the little triangles that are the embers, little bits wafting straight up and
disappearing above the main body of the flame. Most embers don't make it out, but due to
randomness some do. Now the settings to
accomplish this took a bunch of trial and error for me, no getting around that. But through playing with the different
settings, some learning took place so that hopefully the next similar project
would go faster.
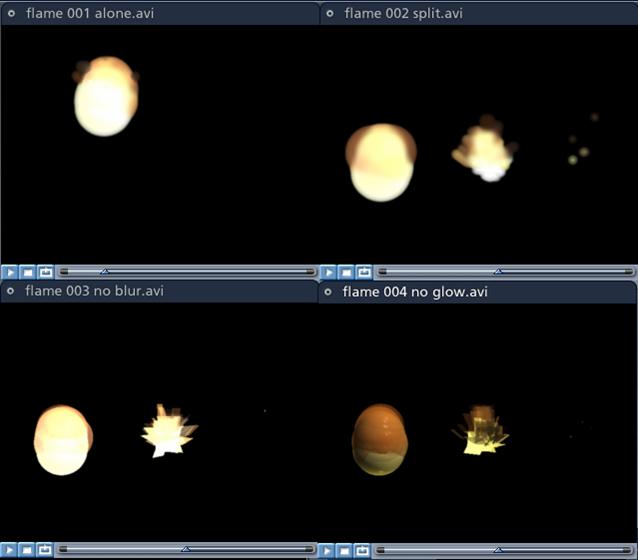
Images of the flame
assembled from the original, then split, then we strip
away elements. First we take away blur, then glow.
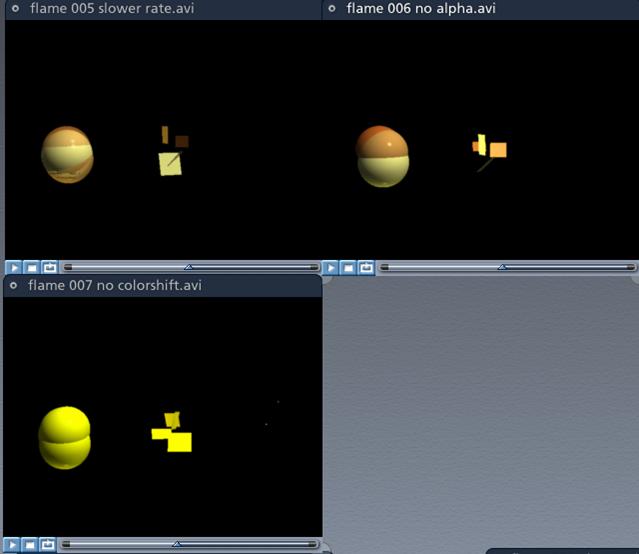
Next we slow down the
particle emission rate for visibility, take away the alpha, then
take away the color change.
Look at the basic tab of an emitter in the model
room, the lower-right particles creation section. There are a lot of important settings to
start with, all of which are relatively self-explanatory by name. There's just no substitute to experimenting
with them, preferably one at a time to see the different effects they
have. Particles per second is very
important, not only for the look but for how it affects performance. Sending out enough particles that there is a
lot of overlap can seem like a waste at times, but for others it can really
smooth out individual shapes like spheres into something more like a stream of
water. What looks nice and tight near
creation might begin to separate further out due to angle/velocity dispersion
if there aren't enough particles. In
some of the example videos a lower particles/second count looked faster because
larger visible sections of the flame body were changing color, shifting around
and winking in and out of existence instead of having these changes smoothed by
having more overlap from higher particle count.
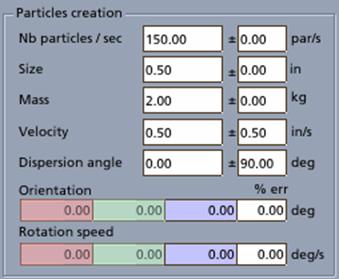
Pay special attention to the +/-
section as it adds randomness that can be very useful. We can set up particles to come out with a
velocity of 1 +/- 0 inches/second, 0 +/- 1 inches per
second or 0.5 +/- 0.5 inches per second for example. Thus in the first case all will be at a speed
of 1 in/s (least variation), the second is between 0 and 1 in/s (most
variation) and the third will be between 0.5 and 1 in/s (some variation). People are great at recognizing visual
patters (texture tiling anyone?) so randomness can be a big help for convincing
particles.
While we're talking speed, we want the particles to
come out from the central point at a bit of an angle to give some variance to
width. But... we mainly want them to go upward as expected
from fire. Whatever velocity and
direction our particles come out with using these settings will stay constant,
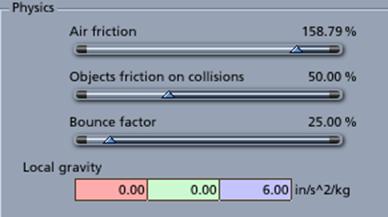
without adding other forces. So now lets go to the advanced tab.
We've got a high value for air friction to help. That means the objects will slow themselves
faster like say tossing a ping pong ball would.
Additionally, we have a gravity force pulling upward. So, no matter what direction and speed our
particles come out, they'll soon enough stop all motion except for going
upward.
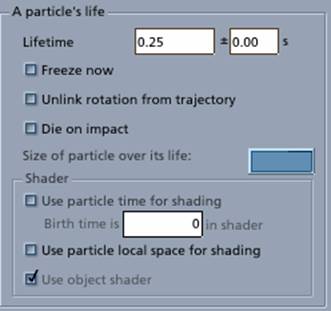
Back to the basic tab look left at "A particle's
life." We have a base lifetime and
an additional random lifetime, after which the particle will disappear. This is very powerful and has quite a few
impacts on our example. Note too that it
can be used to get rid of extra particles that have gone off screen or
behind/through an object and won't be seen again. Even simple particles add a performance hit,
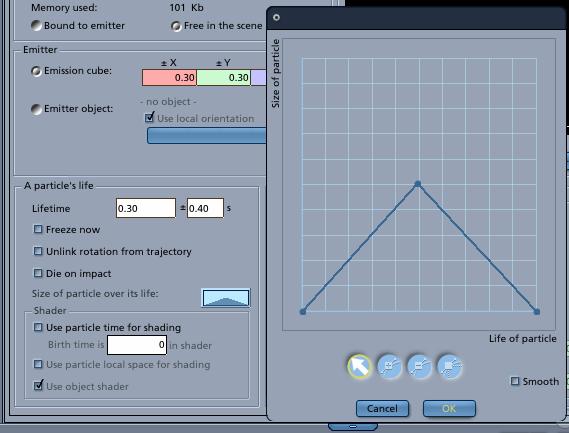
so housekeeping can help keep things manageable. Another easy-to-use and powerful feature is
here, the "size of particle over its life" "box." Click on it and get a graph we can
manipulate. If the graph went from top
left to bottom right, the size of our particle would go from full to infinitely
small over its quarter-second lifetime.
The change is slight with the spheres so it doesn't show up, but it was
used more dramatically with the rough and ember sections to fit them correctly
within the spheres, including on initial emission.
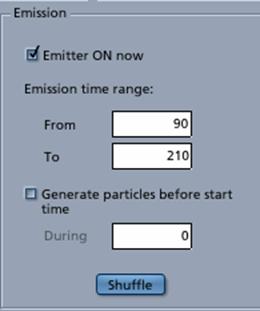
Now let’s look at the middle emission section. Simple in this case, we set up when we want
the emitter to spit out particles. Thus
Miss Aiko turns them on and off in the scene.
Note it is labeled "time" but the units are frames.
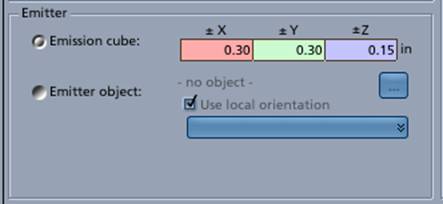
To the left is the emitter section where the emission
cube setting is used. Changing the
values here sets up an area from which any particle might originate. Some you'll want focused on a pinpoint, others would best be spread out at least in one
dimension. For example by giving some X
and Y values to the embers, they don't need as much lateral initial velocity,
but already come into being spread out a little within the flame body and can
go more straight up.
Now to lead us into textures, we'll look at one last
important feature. In the upper left we
have two choices, Bound to emitter and Free in scene. We're going to take Free in scene. Bound to emitter means that particles that
have already been emitted will move with the emitter, which can be a nice
effect. In our case we want flame out
there in the air that will trail behind the emitter when the emitter moves
(like the smoke from a moving coal burning train).

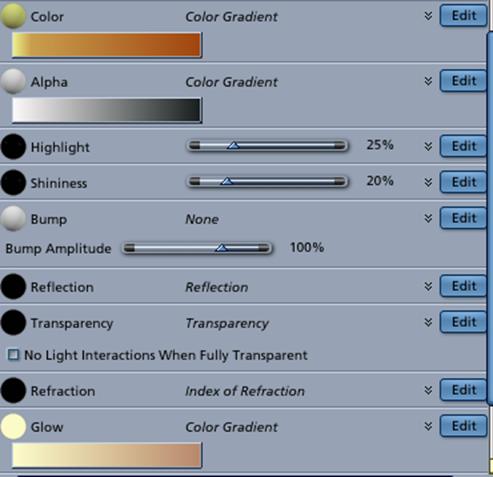
Now we've got the geometry elements of our flame covered,
we need to cover the texture. Each
element uses its own copy of the same shader as a
starting point (they’re very similar).
As each chunk of our flame is generated, it is youngest and
hottest. We want it to have the most
visibility and the brightest color. Our chunk of flame at the end of its life though before
disappearing should be cooler and at its faintest. Lets say yellow to
orange over its lifetime. To do this
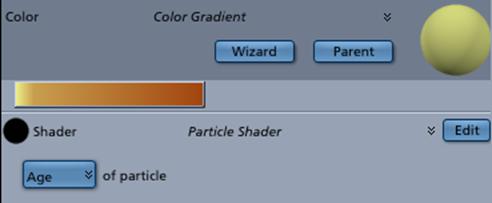
we'll pick a color gradient for the color, alpha and glow channels. Then click on edit and see the shader below the gradient.
Set this to Natural Functions > Particle Shader. Now among the "... of shader" settings, we select "Age." If you're already picturing the possibilities
(other categories are size, mass, speed and order) you realize to us its more
"Magical Functions" than "Natural" ones in our case, but
why quibble?!
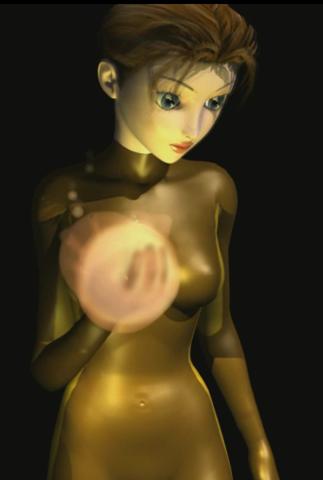
Yes,
There are some good shots of this if you move through
the animation frames of Tawny toward the end of the flames where she's sweeping
her arm in front of her, causing the "tail" of the flame to be its
longest with the most separation in the individual elements (our "Free in
scene" setting) and at the end when she's closing her hand. The emitters have already been turned off at
that point, we're simply watching the last emitted
particles dying with no fresh ones keeping the cycle going. Notice too that due to this that when her
hand is moving away from the camera, we get more old spheres in the front not
fully covered by new young spheres, Thus
there are some neat patterns of cooler orange and yellow that appear. When her hand is moving toward the camera,
the glows from the younger spheres stack making a much more white flame.
Final settings notes would be that the blur effect of
C5 has been applied to each emitter to the tune of 10 percent. In a lot of cases we can't really see the
embers in the example 320x240 animations where blur is turned off because the
particles are too small without it. Cast
and receive shadows have been turned off for the emitters. This makes rendering go faster, plus you
wouldn't see shadows on a flame, or being cast from a flame.
Oh wait, fire would cast shadows. What was done in this case was to simply add
a point (bulb) light near the heart of the flame mass, with a short range. One extra bulb isn't a ton of overhead. It was manually keyframed
to vary between different shades of orange and yellow every 3 frames (sometimes
2 or 4 though to break pattern). The
bulb also moves a tiny bit left or right, up or down and then back to center
with each key frame to add more shadow flicker.
Keyframes added of course to quickly go from
and to blackness at beginning and end of emissions. Having the particle effect appear to be
casting a decent fiery light on its surroundings makes it more convincing. Now it is possible to set up emitters to send
out lights too, but this was at the end of the project and I just plowed
through with simple, tried and true.
Putting it all together, all three emitters and the
light are placed together in the scene and parented to a small sphere with 100%
alpha. With this done, we can drag the
emitter anywhere and while it is on it will behave the same. Thus we've got a 3d fire implementation that
will render in the same pass as the rest of the scene and look plausible from
any angle (at least in theory).
There are certainly better and different fire
effects, this was just one approach. It
previews and renders fairly quickly for what it does. Hope the effect, comments and/or examples are
helpful to you in some way!